# | include: false
import numpy as np
import pandas as pd

np.random.seed(256852)Hello, GitHub! (Need)

GitHub is an online service to help develop and maintain code. It is called GitHub because it is based on a version control tool called Git. A key feature of Git and GitHub is how it helps keep track of the changes to code. You can think of GitHub as a sophisticated version of Google Drive or Dropbox. The know-how to use Git and GitHub is a plus for tech employees.
73 will use the educational branch of GitHub called GitHub Classroom. We will only use the simplest features of GitHub Classroom that allow you to share your code and solicit instructor feedback. In this chapter, I will take you through the setup process for GitHub Classroom. If you are already familiar with GitHub, feel free to jump ahead.
Setting up GitHub Classroom
Create an account with GitHub
Please visit github.com and use the button (located at the top right corner) to create a new GitHub account.
You can use this GitHub account forever1, even after you leave NUS. So, use any email address you like.
Link to 73 GitHub Classroom
Now that you have a GitHub account, let’s link it to the 73 GitHub Classroom I have set up for you. The button below will take you to the registration page for the 73 GitHub Classroom. You will be asked to link your GitHub account to an identifier in the class roster. Please link the account to your NUS User ID shown in the list.
Once this is done, GitHub will create your very own repository that will hold your Learning Portfolio. You can think of a repository as a folder on the GitHub server created to hold your Learning Portfolio.
Enabling ReviewNB
![]() Let’s now enable ReviewNB for the 73 GitHub Classroom. This will add a friendly interface to read and respond to the instructor’s feedback for your Learning Portfolio.
Let’s now enable ReviewNB for the 73 GitHub Classroom. This will add a friendly interface to read and respond to the instructor’s feedback for your Learning Portfolio.
To do this:
- Please go to reviewnb.com.
- Press the button
- When asked to choose a repository, please pick
SPS-SP2273/sp2273-learning-portfolio
Setting up your local environment with GitHub Desktop
![]() Now that we have set up everything in the cloud, let’s make a copy of the repository on your local machine. Installing GitHub Desktop on your machine is the easiest way to do this. The friendly graphical user interface (GUI) will make things easier at the start.
Now that we have set up everything in the cloud, let’s make a copy of the repository on your local machine. Installing GitHub Desktop on your machine is the easiest way to do this. The friendly graphical user interface (GUI) will make things easier at the start.
- Visit desktop.github.com and download and install GitHub Desktop.
- Now, let’s run GitHub Desktop for the first time.
- It will ask you to log into your GitHub account; please do so.
- Once done, GitHub will ask you to give permission to connect your GitHub account with the GitHub Desktop on your machine; please allow this, too.
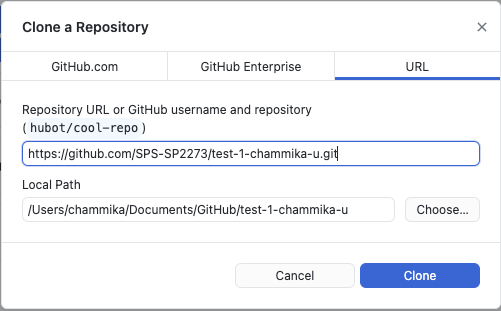
- Now, GitHub Desktop will ask which repositories in the cloud you want to be copied and connected to on your computer. Please select the SPS-SP2273 repository from the list and click the button.
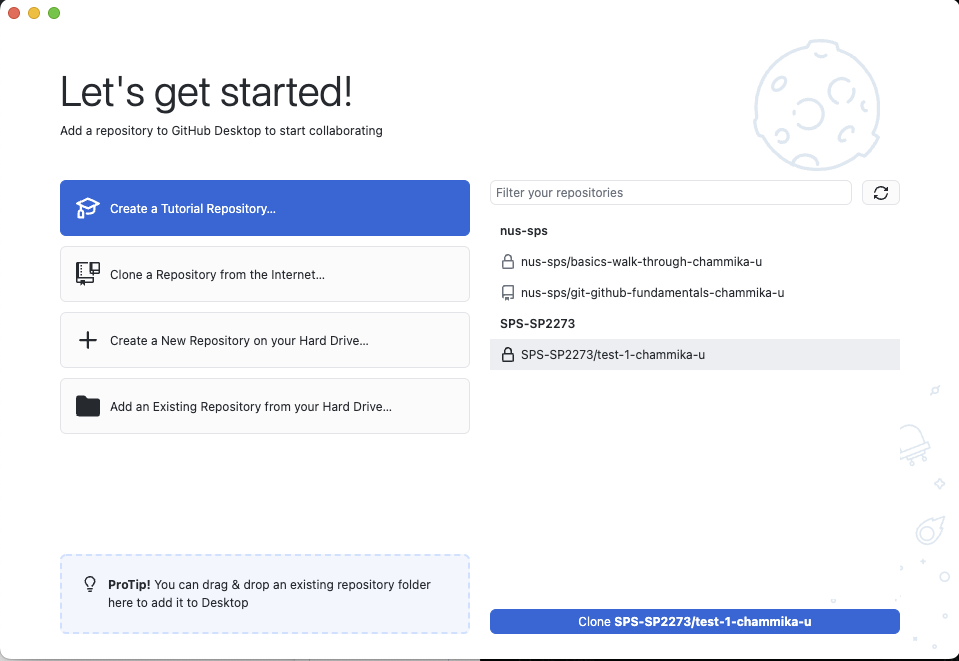
- You will then have to specify where on your machine you want this repository cloned. Since you will use this folder for the rest of the semester, please put it in a convenient location. I will refer to this folder as the Learning Portfolio.
Using Git & GitHub
Recording changes with GitHub
I mentioned before that GitHub allows you to track changes in your repository. However, you have complete control of what will be tracked. You specify what changes to track by making a commit.
A commit specifies what file changes you want to be recorded and attaches a brief description of these changes. This will make it easy for you to see the evolution of your repository. An example of a commit description can be “Completed exercise 1 of the first chapter!”.
In this step, I will show you how to make a commit.
- Use the Windows File Explorer(Windows ) or the Mac Finder(macOS ) to go to the folder (Learning Portfolio) you just cloned using GitHub Desktop.
- In this folder (i.e., the Learning Portfolio), you will see a sub-directory called
Testing. Navigate into this folder and create a new text filemy-new-file.txtusing Notepad (Windows ) or TextEdit (macOS ). - Write something in the file (e. g. “42 is the answer!”) and save it.
- When you go back to GitHub Desktop, it will show you the changes in your repository. Use the checkboxes to specify what changes you want to be committed.
- Write a quick note about this commit (e.g., “Added a my-new-file.txt to test GitHub”).
- You can then press the button. That’s it.
A complete history of your activities should be available under the History tab.
Pushing Changes to GitHub
Your commits are initially recorded locally on your device, not in the cloud. Therefore, to share (push) your changes with GitHub (and anyone else sharing the repository), you need to push these changes to the server (usually referred to as the origin). To push your changes, click the button at the top.
To check if this worked as expected, please visit your 73 GitHub Classroom repository on the web by going to github.com. In that, you will see your new file.
All this is is very important:
Remember
Remember to commit to your work regularly, especially at the end of a lecture or tutorial session.
Pulling Changes from GitHub
GitHub is typically used for collaboration. This means that Git and GitHub have rich features to synchronise and resolve file conflicts. When we want to save(pull) changes from the cloud to our local machine, we call it a pull. There are several ways to pull and resolve conflicts. I will not go into that now. I will just show you how the pull works.
For this:
- Please visit your 73 GitHub Classroom repository on the web by going to github.com.
- Locate
my-new-file.txtand click on it. - Now locate the edit button shown below and start editing the file.
- Edit the file and a new line (e.g., “**Yes! 42 is indeed the answer.”).
- Now press the button and add a commit message in the dialog that appears and complete the process.
- Now, return to GitHub Desktop (i.e., the local copy of the repository) and press the button.
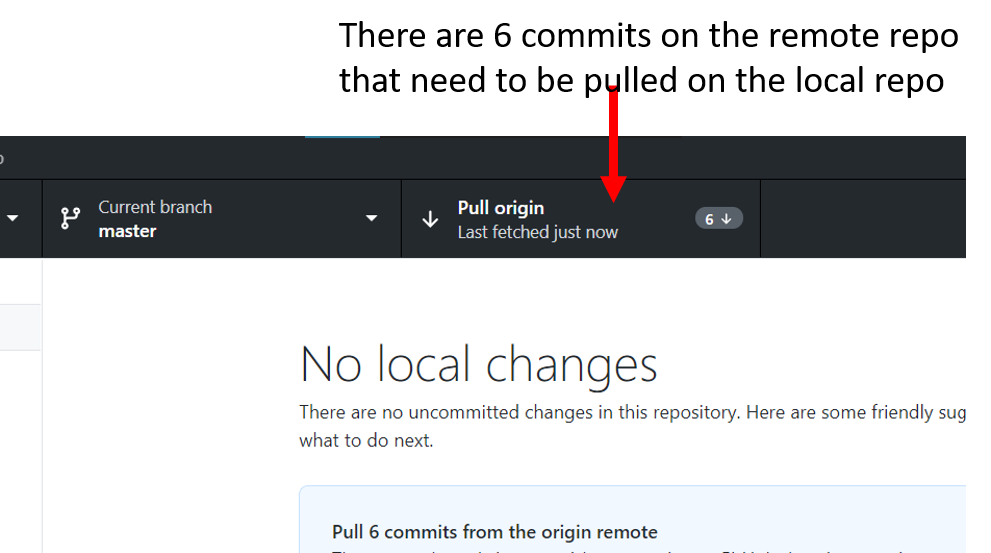
- You will not have the changes you made in the cloud available locally.
Footnotes
or the End of the Universe↩︎