Task 0| Hello Colab

What to expect in this chapter
We will use an online tool from Google called Colab for the Application Challenge and the Mini Project. Colab simplifies collaborating on a Notebook, allowing multiple users to work together seamlessly. You can think of a Colab Notebook as a Jupyter Notebook but with all the features of Google Docs (e.g., commenting, sharing) added in. Colab is free; you only need a Google account to access it. Even cooler is Colab has integrated AI features that will help you with your coding.
Here is a short video that will introduce you to Colab.
1 Getting started with Colab
1.1 Accessing Colab
- To access Colab, please visit colab.google and Create a new Notebook.
- The notebook will be stored/saved in your Google Drive under a folder called Colab Notebooks. If you want to quickly locate where it is stored, go to
File→Locate in Drive. - If you like, you can directly upload (
File→Upload Notebook) a Jupyter.ipynbNotebook, and it will be converted into a Colab Notebook. - You can also download (
File→Download→Download .ipynb) a Colab Notebook as a Jupyter.ipynbNotebook. You will need to do this to submit your work to CANVAS.
1.2 Running Python
Colab works just like a Jupyter Notebook. Test out by:
print('Hello Colab!')The first cell you run will be slow because Colab will take time to create and connect to a virtual (Linux) machine.
1.3 Installing package
Colab uses a package manager called pip (not conda). When you want to install something (say the package Seaborn), you need to:
!pip install seaborn2 Collaborating: Sharing & Commenting

Collaborating via Colab is absurdly easy. Just click the Share button on the top right.
Commenting is also straightforward; just click the Comment button.
Unfortunately, Colab does not offer real-time collaboration. Any updates you make will take tens of seconds to minutes to appear in your collaborator’s Notebook. This is due to lattencies in the network of instances that need to speak to each other behind the scene.
3 Files
3.1 Uploading files to Colab
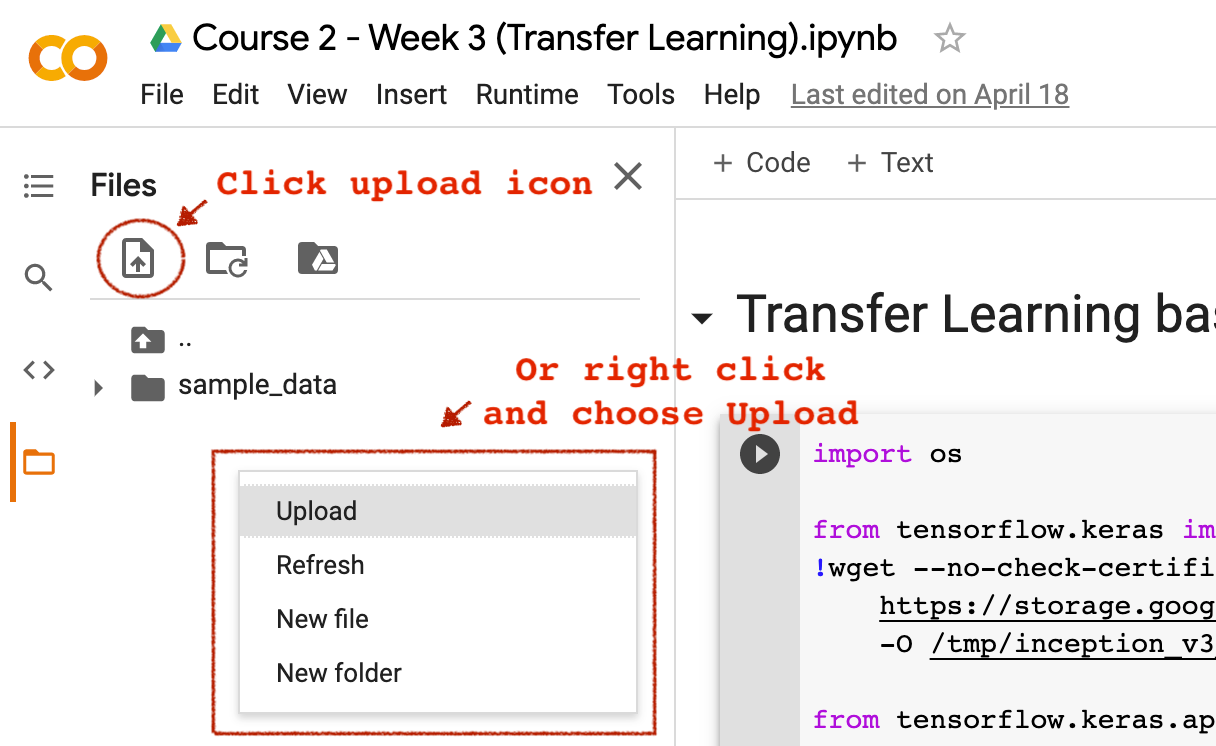
To upload data to Colab you should look for the folder icon on the left, shown in the figure above.
Every time you log out of Colab, it resets the (Linux) machine it created for you. This means you will lose any files you uploaded to the machine(instance) unless you download them or make a copy in your Google Drive.
3.2 Let’s Practice
Please upload the
Complete_TAVG_daily.txtfile with the Global Temperature data (from here).Now, let’s use this data.
data = np.loadtxt('Complete_TAVG_daily.txt',
                skiprows=24)
date = data[:, 0]
anomaly = data[:, -1]

plt.plot(date, anomaly, alpha=.5)
plt.ylim([-8, 8])
plt.savefig('global-temperatures.png', dpi=150)
You should see the file
global-temperatures.pngin your folder. If not, press the Folder Refresh button.To download this file, just right-click and download.
4 Connecting to your Google Drive
A better option is to link your Google drive to your Colab session. To do this, run the following code:
from google.colab import drive
drive.mount('/content/HAHAHAHA')
Once you do this, you will be asked permission to connect to your drive. Your drive will appear as the folder MyDrive in HAHAHAHA in your folder structure.
If you now want to save the previous plot directly into your Google Drive, you should use:
plt.savefig('./HAHAHAHA/MyDrive/global-temperatures.png', dpi=150)5 Things you need to do
Please share your Colab Notebooks related to the Application Challenge and Mini project with your assigned mentors and instructors.
- Chammika Udalagama (
chammika.udalagama@sps.nus.edu.sg) - Yuan Zhe Lee (
yuanzhe.lee12@sps.nus.edu.sg) - Jia Lin Kellisa Goh (
kellisa.goh19@sps.nus.edu.sg) - Chee Onn Ku (
cheeonn.ku@sps.nus.edu.sg)