3D Printing in SPS

Table of Contents

Ingredients

  • An object file
  • Some time
  • A computer with PrusaSlicer
  • A USB-A thumbdrive
  • Some 3D printer filament (PLA, or PETG)

Instructions

Preparing the Object File

Step 1: Get an Object file! An object file is either a model you’ve created using 3D modelling software like  TinkerCAD, or found online. Some samples can be found on Thingiverse.

Step 2: Slice the object! For objects to be 3D printed, it has to be first converted into a .gcode file. This tells the 3D printer how to print the item in layers. This is done with the PrusaSlicer application. Once you open the 3D object file in PrusaSlicer, rotate it (if necessary) such that it should be stable when printed. Select PrusaMINI+ as the printer.

Step 2A: To slice, you’ll need to select a detail level, as well as the materials used. Check the currently loaded filament reel to verify the material. Most times, we print with PLA.

Step 2B: Next, select an object detail level. This determines the resolution of your end product. The higher the resolution, the longer it takes to print. Usually, 0.15mm would work more than fine.

Step 2C: Afterwards, if your object has any overhanging sides (that is, stuff that looks like a bridge), adding supports is a good way to go. Select Supports, then Supports on Build Plate Only. 

Step 2D: Finally, select an infill level. This determines how strong your print is. This really depends on the purpose of your 3D print, and some models on Thingiverse would specify the ideal infill level. Otherwise, usually around 15-20%.

Step 3: You are finally ready to slice. Hit the slice button, and see the end result. If it warns about the stability of the print, try again with a different orientation.

Step 4: Save and transfer the .gcode file to a thumbdrive. You will be inserting this thumbdrive into the 3D printer.

Preparing the 3D Printer Plate

Step 5: Take the steel plate out of the bubble wrap and clean the top grid with isopropyl alcohol

– There are bottles of isopropyl alcohol on the right of the Prusa MINI
– Do not touch the grid as oil from your fingers may cause the plastic to not stick and disrupt the printing process. Hold the bottom left and right extended parts of the metal sheet only (see image for reference)

Printing plate of a 3D printer. The surface is made of a 4 by 4 grid, and is reflective in the middle. The words "Original Prusa Mini" are at the bottom right corner.
Image of steel plate from above

Step 6: Cut the tip of the filament using a pair of wire cutters at an angle such that it is sharp
– This is so that you can load the filament into the tube without it getting jammed
Step 7: Load the filament into the clear tube of the Prusa MINI
Step 8: Select FILAMENT on the printer and choose LOAD FILAMENT while applying slight force to push the filament into the tube. You will know the filament is loaded once you see it entering the inner tube
Step 9: The printer will spew some filament naturally; let it finish then select YES when the printer prompts you to check if the colour of the spewed filament matches the colour of the loaded filament
Step 10: Next, the printer needs to be calibrated using LIVE Z ADJUST to -1.178
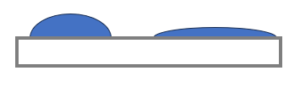
– When the printer is printing a Z-line on the board, the trail should not be wide and flat but thin and slightly rounded. If the trail is too flat, increase the Z-value slightly and vice versa.

Two beads of 3D printed plastic on a surface. The bead on the left bulges upwards, while the bead on the right is flat.
Sideview of trail on steel plate. Left: Thinner and rounded trail (ideal) Right: Wider and flatter trail

Ready to Print

Step 11: Upon completion of above steps, insert thumbdrive at the side of the printer and select PRINT from the menu
– Time until completion displayed is inaccurate, expect delays.

Step 12: Remember to remove your print when done. Watch out, the plate will be hot, ensure it is cool before pulling it off!

Join the SPS 3D Printing Group!

Join us on Telegram for more assistance!

Should you need to book the 3D printer, please use this document.